Based on an example I read (possibly on these forums) about writing up the results of both secondary mission rolls and rejected missions before the game, I wrote up these three mission outcomes for our first session. I rolled three assault missions for the Western Front. This meant there was not much variety to pick from…which was fine, since the Commander’s declared preference was Assault missions.
I added something to the rules for Secondary missions: a Crit, 6, or 4/5 non-retreat roll on the Secondary mission (may) provides a small additional benefit to the Legion, and 1-3 or 4/5 retreat can have an additional, small penalty based on the fiction. This can make choosing a technically “useless” mission more rewarding (the Legion had full morale, so Operation Diamond Hawk in particular didn’t provide a whole lot of benefit for taking on – people singing the Legion’s praises and getting a little help from them on projects seemed appropriate, given the fiction).
Operation Diamond Hawk
Success: +4 Morale
Failure: +1 Pressure
Set-up: Squads of Zemyati soldiers retreating to the Western Front after the defeat at the Battle of Ettenmark Fields have taken to “conscripting” food and goods from Aldemari refugees fleeing ahead of the undead advance. Representatives of a group of refugees have approached the Legion encampment, begging them for protection from these rogue soldiers and providing an escort north to Plainsworth. It would be good for the troops to feel like they’re doing something decent for their fellow man; it is also likely these bandits will harass the Legion and attempt to steal our supplies unless they are defeated or driven away.
As Primary: Avoid or Engage the Rotter Patrols, Locate and deal with the Zemyati Raiders.
Obstacles: Rotter Patrols, No Man’s Land, Zemyati Raiders.
3 T1 Rotter patrols of 6 each. Controlled by 1 T2 Horror.
2 T1 Zemyati squads of 5 each. Control a semi-fortified camp in the ruined foundation walls of an Old Empire tower.
Outcomes as Secondary:
Crit: The squad set a trap for the Zemyati soldiers, killing a number of them in the attempt and forcing the surrender of the rest, whom they drag back to camp in chains for the Commander to deal with (start an empty 4-clock to rehabilitate them and gain two Rookies when it finishes, or just execute the lot – Commander’s choice). The thankful refugees travel with the Legion to Plainsworth and will provide one tick for any Long-term projects the Quartermaster starts before the Legion reaches the city (similar to a Labor resource). The refugees leave the Legion in Plainsworth.
6: The squad engaged the Zemyati soldiers directly, driving them into a couple squads of Rotters led by a Horror. From what the legionnaires saw before retreating, it is unlikely any of the Zemyati survived the encounter. At any rate, there won’t be enough of them to trouble either the Legion or the refugees. The thankful refugees travel with the Legion to Plainsworth and will provide one tick for any Long-term projects the Quartermaster starts before the Legion reaches the city (similar to a Labor resource). The refugees leave the Legion in Plainsworth.
4/5: Retreat: The squad briefly skirmished with the Zemyati soldiers on the outskirts of their camp among the ruined foundation walls of an Old Empire tower, but it was quicky apparent the raiders were better-prepared and equipped than one squad could deal with, so they broke off the engagement and retreated. One of the Rookies wasn’t watching where he was going and sprained an ankle on the way back, but the Mercy says he’ll be fine. The refugees are disappointed at the failure and scared.
4/5: Fight: The squad engaged the Zemyati soldiers, but attracted by the noise of their combat, a couple squads of Rotters led by a Horror rushed both groups. The combat became a chaotic melee and the squad was scattered. It is unlikely the Zemyati are in any shape to further trouble the refugees or the Legion, but the squad took some injuries, and while one of the missing Rookies eventually stumbled into camp later, not everyone made it back… Still, the refugees are grateful and ask to travel with the Legion to Plainsworth. They can provide one tick for a single Long-term project the Quartermaster starts before the Legion reaches the city (similar to a Labor resource). The refugees leave the Legion in Plainsworth.
1-3: There were more of the Zemyati soldiers than intel suggested, who turned the tables on the Legion’s attempted ambush outside their camp. After a brief, bloody skirmish resulting in serious injuries to the Specialists, and the loss of most of the Rookies, the survivors dragged one another back to camp. The Zemyati soldiers are going to be a problem for the refugees and the Legion. The refugees push on, leaving the Legion behind, spreading tales of their failure.
Ignore: The Legion just can’t spare the resources to protect the refugees and go after these rogue Zemyati. Zora is also concerned any of the refugees could be one of Breaker’s hexed spies…the increasing number of red-eyed crows around the camp suggests the Broken or her Shadow Witches are nearby. No matter how many of the feathered creatures you shoot down, there always seem more to replace them. The refugees will just have to look out for themselves. Everyone gets put on double guard duty (if there were any disciplinary issues before this, start or tick a 6-clock “Unhappy Rookies” resulting in -1d to Engagement rolls if it fills).
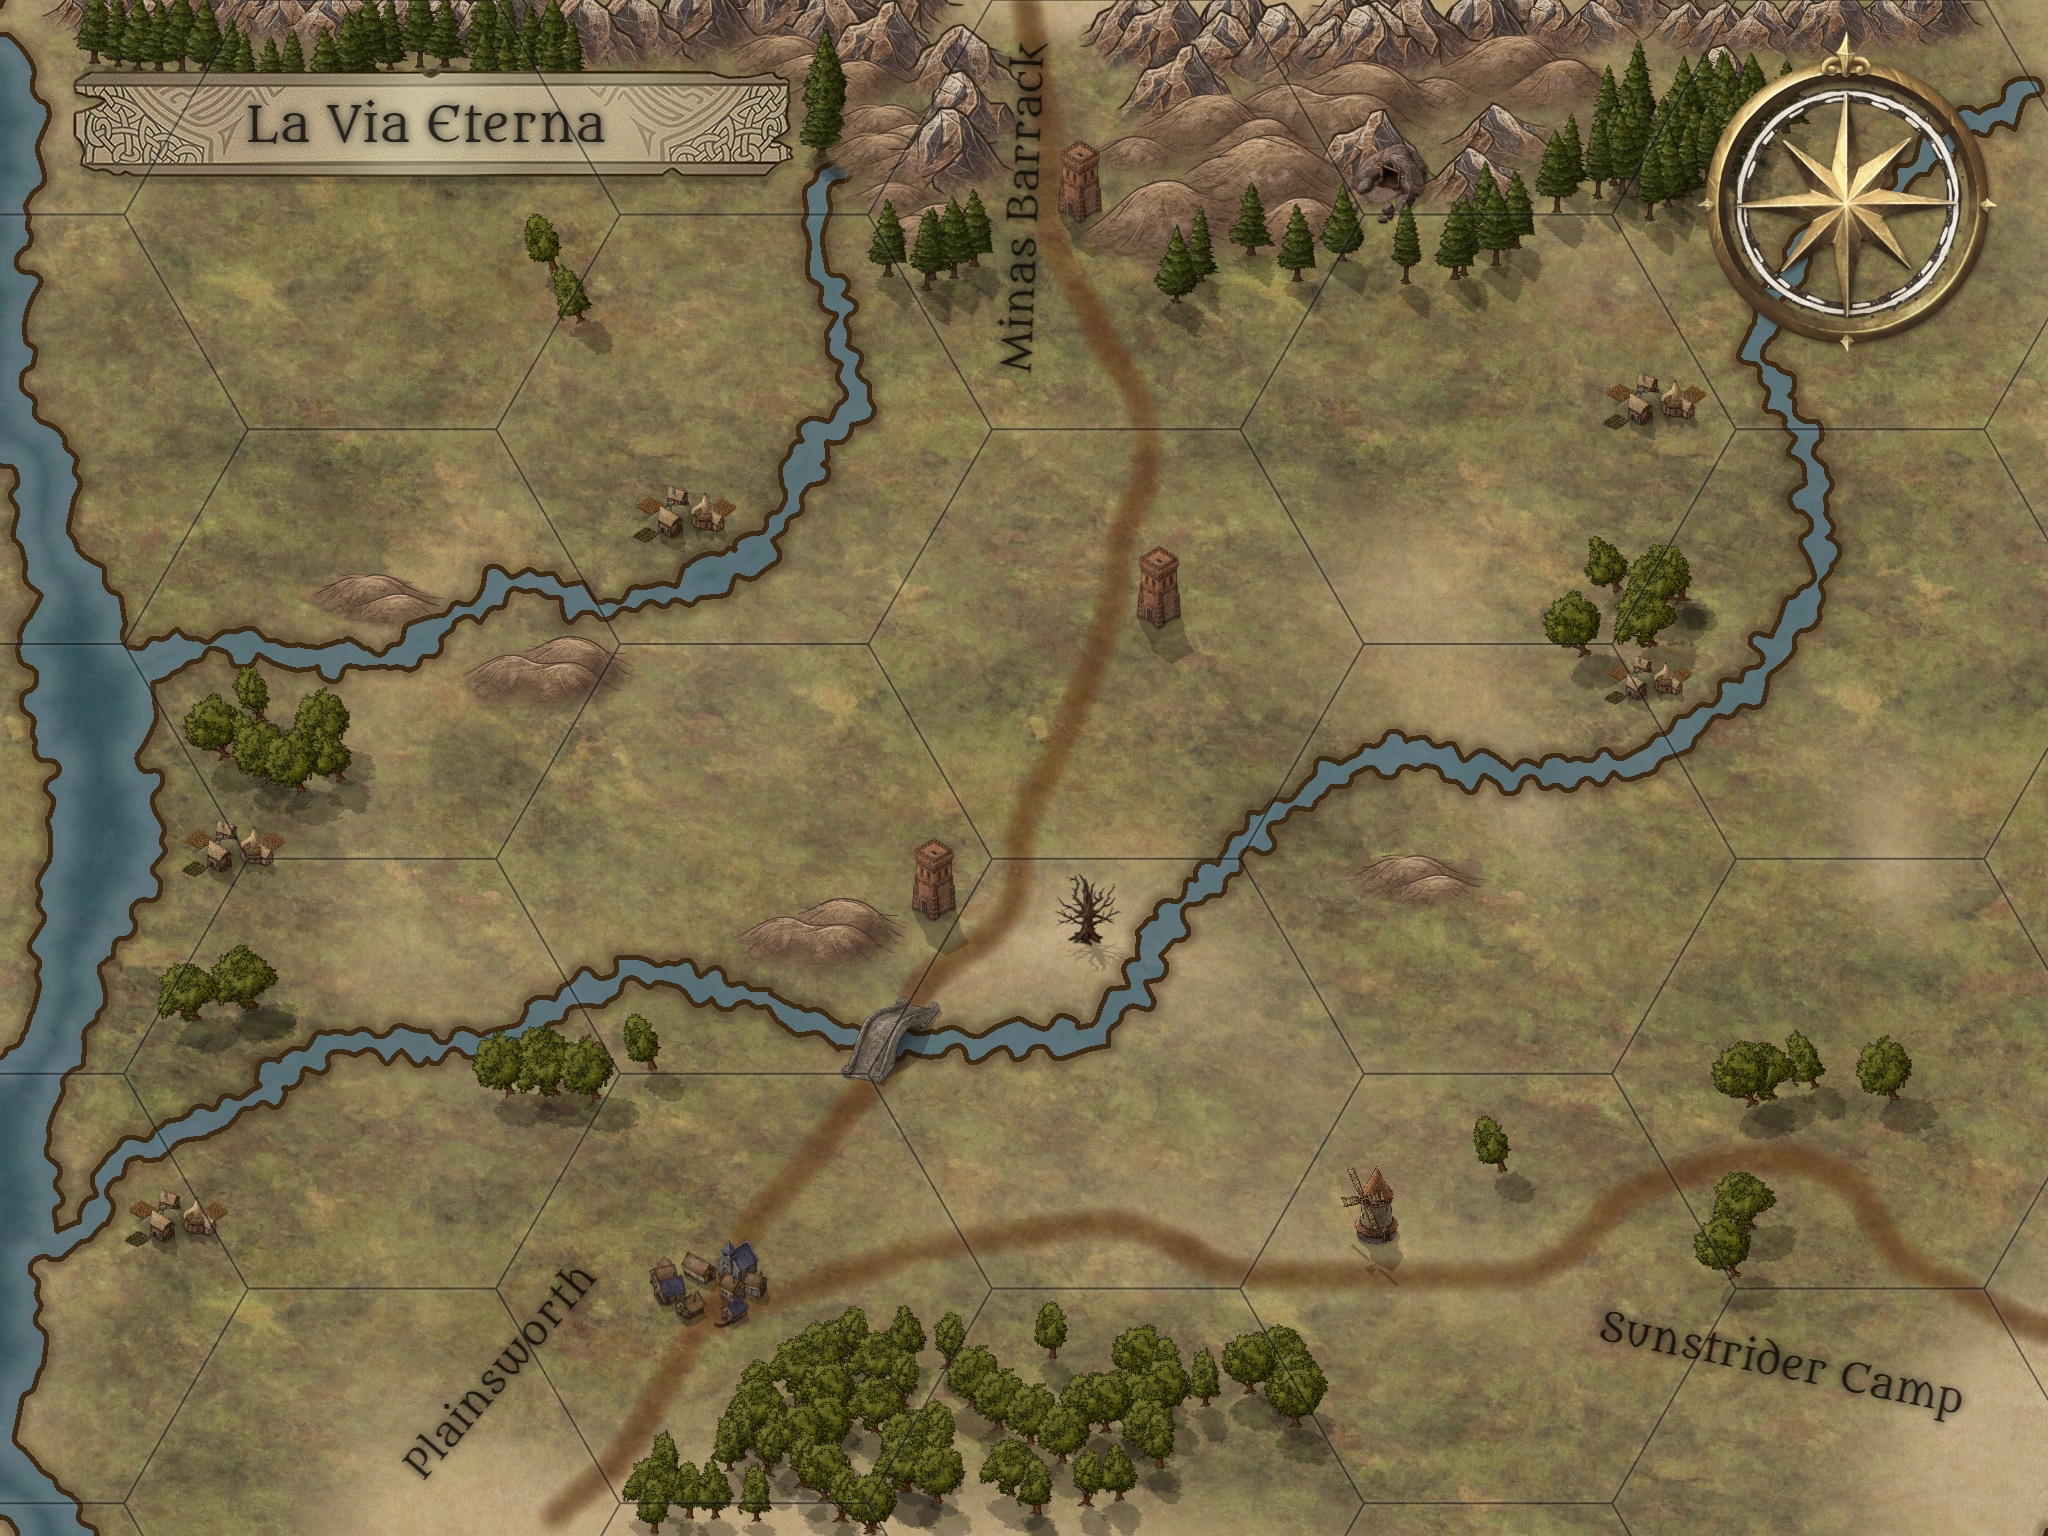
Operation Western Tiger
Success: +2 Morale, +1 Intel
Failure: +1 Pressure
Setup: A scout has returned with a report that a few squads of Rotters and their handlers will be crossing the bridge from Karlsburg, transporting a wagon-load of the foul alchemicals Blighter uses to transform fallen bodies into the undead. Destroying this batch of ichor would strike a small blow against the Cinder King’s ability to reinforce his armies. More importantly, tracking it might lead you to where Blighter has dug her corruption pits on this side of the Tigeria river…
As Primary: Locate the Wagon, Track it to Blighter’s Corruption Pits, Blow the Wagon.
Obstacles: Rotter Patrols, Blighter’s Mists, Wagon Escorts.
2 T1 Rotter escorts, 6 each. Controlled by 1 T2 Horror.
The pit is a open-air mass grave into which Blighter’s troops throw both bodies and alchemical concoctions. New Rotters are constantly crawling out of it. There are cages nearby with about a dozen living prisoners, and large tents into which these prisoners are sometimes dragged, screaming, by the Crows. (If the squad goes into the pits, they might encounter 3 packs of T1 Rotters, 2 squads of Crows, and the Wailer.)
Outcomes as Secondary:
Crit: Not only did the squad manage to distract the escorts long enough to sneak charges onto the wagon and blow the alchemics, and their escorts, into smoke and charred bits, but thanks to clever rigging of timers on the charges, it went off in the middle of Blighter’s new corruption pits, turning them into a conflagration. That’s going to put a serious dent in her ability to raise new Rotters. (The next few missions will have 1 less Threat.) While the squad didn’t see Blighter at the pits, there was a huge Horror with nine wailing heads sewn to its body directing the other creatures in the pits…unfortunately, the blast didn’t seem to faze it. The squad is calling it “the Wailer.”
6: Once they trailed the wagon close to the corruption pits, the squad engaged its escorts long enough for one of them to sneak charges onto the wagon and blow the alchemics, and their escorts, into smoke and charred bits, putting a dent in Blighter’s ability to raise new Rotters for her armies (the Legion gets +1d to their engagement rolls for the next few missions). The pits looked to be fairly new, and were crawling with black-cloaked creatures wearing white plague masks doing…something to living prisoners. They didn’t see Blighter there, but they did see a huge Horror with nine wailing heads sewn to its body directing the other creatures in the pits. The squad is calling it “the Wailer.”
4/5: Retreat: When the squad reached the wagon, its escorts were more numerous than the scouts had reported, and Breaker’s damnable red-eyed crows were circling, ready to give away their position to Blighter’s troops. The squad chose to withdraw rather than risk it.
4/5: Fight: Trailing the wagon, the squad jumped the escorts just outside the pits and drew them off long enough for one of the Rookies to sneak charges onto the wagon and blow the alchemics into smoke. Unfortunately, the Rookie was killed in the explosion, but valiantly took the Horror with him. Another Rookie fell in the brief melee when the Rotters turned feral. At least they’ve put a dent in Blighter’s ability to raise new Rotters for her armies (the Legion gets +1d to their engagement rolls for the next couple missions). The squad had to retreat before reinforcements were drawn by the noise, but not before sighting Blighter’s pits, crawling with black-cloaked creatures wearing white plague masks, being directed by a huge Horror with nine wailing heads sewn to its body. The squad is calling it “the Wailer.”
1-3: Things went seriously pear-shaped. There were two Horrors and multiple squads of Rotters guarding the carts. Worse, some of Breaker’s red-eyed crows were flying around and alerted Blighter’s troops to the squad’s presence before they could decide to retreat. A few of the Rookies died in a heroic, but ultimately unsuccessful attempt to blow the alchemics on the carts…their mangled bodies will probably be in the next batch of Rotters or Horrors Blighter stitches together. No one is thrilled at the prospect they might have to fight their former comrades…or pieces of them. The Specialists were severely wounded while leading the retreat, and are being treated by the Medics and the Mercy. The squad never had a chance to locate the corruption pits.
Ignore: Based on the Legion’s needs and resources, and the dangers involved in heading back into enemy territory, there are more pressing matters to attend than chasing down a single wagon of alchemics that might or might not lead to a benefit of dubious tactical value. Even if the Legion could destroy it, Blighter would just dig another pit, and has plenty more alchemics to fuel her armies…a few more Rotters testing the Legion’s defenses are the price of not losing good men and women on a fool’s errand.
Operation Crimson Fire
Success: +2 Morale, +1 Intel
Failure: +1 Pressure, +1 Time
Setup: A small village a day’s travel north from the Legion encampment is surrounded by a lightning-blasted woodland. Zora says this is a sign of Breaker, or of her Shadow Witches, and that it would not be safe for the Legion to travel through the area without first cleansing the area: destroying the trees, and then razing the village to the ground. Unfortunately, the old Imperial highway runs directly through the wood. While the Legion could detour west around the wood, the terrain is rough and already over-run by Blighter’s forces, which would make the going slow and dangerous.
As Primary: Scout the Burned Woods and the Village, Cleanse Them.
Obstacles: Breaker’s Animal Scouts, Violent Storms, Hex Magic.
2 squads of T1 Burned. 1 squad of T1 Hexed hidden among the villagers. Controlled by 1 T2 Shadow Witch. The Shadow Witch will attempt to hex one of the squad, forcing him to attack the others as a distraction, and ultimately wishes to sacrifice the legionnaires in a ritual to turn them into Burned.
Outcomes as Secondary:
Crit: Breaker’s own storms provided a perfect cover for the squad, and they were able to sneak into the village to watch the goings-on without being noticed. Many of the villagers were acting strangely, and gathered together at night to impale other struggling members of the village upon the trunks of trees, directed by a pale Aldemari woman who used her clawed fingers to carve hex-marks into their flesh. The squad quickly set fire to everything – the trees proved particularly dry, despite the constant storm. As the squad retreated from the burning wood, the pale woman stumbled out after them, begging for their help and mercy…even while viciously attacking the squad via dark magic. Zora’s blessed seals held, and they put the witch down. She died croaking out a curse from Breaker’s own lips, promising revenge. Zora insists the hex didn’t take, but it has left the squad spooked (unless it’s the Star Vipers: they’re living up to their history; the next time they are sent to face Breaker’s forces, they get +1d to the engagement roll). Breaker’s spying crows haven’t been sighted since (no Animal Spies will appear for the next few missions).
6: Breaker’s own storms provided a perfect cover for the squad, and they were able to sneak into the village to watch the goings-on without being noticed. A pale Aldemari girl was leading a group of glassy-eyed villagers in a dark ritual in the wood, impaling one of the other villagers upon a hex-carved tree while casting curses and enchantments over the body. The squad quickly set fire to the forest and the village, suffering a few minor burns, and have been plagued by nightmares of the dark rituals they witnessed. Breaker’s spying crows haven’t been sighted since (no Animal Spies will appear for the next couple missions).
4/5: Retreat: A powerful storm swept down on the squad as they moved through the woods and into the village. While they saw no sign of the Shadow Witch, many of the villagers seemed to be acting…strangely. Spooked, the squad quickly left without making contact. A couple of the squad have caught colds from the weather, but should be fine after a day of rest.
4/5: Fight: A powerful storm swept down as the squad moved north and into the village. They sought shelter in the village and were offered a place to sleep by a friendly Aldemari woman. While they saw no sign of an undead presence in the village, some of the people seemed to be acting…strangely. In the middle of the night, the woman enticed one of the Rookies with promises of ‘companionship’. When he returned, he attacked his bunkmate, strangling him in his sleep and waking the rest of the squad! Haunt-eyed villagers had gathered around the woman’s house, forcing the surviving squad members to fight their way free. They set the house on fire, then threw burning brands into every residence. The flames quickly spread to the trees, and the squad fled from the blazing woodland, suffering from burns and smoke inhalation. The good news is during their flight, they located an easy trail that can quickly take the Legion around the still smoking woodland and back onto the old Imperial highway. The villagers appear to have died in the conflagration, or fled.
1-3: In the midst of a terrible storm that arose when the squad entered the lighting-blasted wood, a dozen corpses whose open chests were burning beds of coal rushed screaming out of the trees and set upon them. Surprised and outnumbered, confused by the lashing rain and blinding lighting strikes, the squad was scattered. One-by-one the few survivors have limped or been dragged back to camp. There are dark stories about what probably happened to the others. The Legion will have to take another route around the haunted woodland and hope Breaker is too busy with whatever she’s doing in the village to care.
Ignore: The threat of a village of witches giving Breaker the Legion’s exact location so she can set-up an ambush is too dangerous a prospect. When the Legion heads north, you’ll simply have to abandon the easy travel provided by the old Imperial highway and make your way cross-country past the woodland. It will be slow and dangerous, but what about this war isn’t?
The group ignored Diamond Hawk, and chose Western Tiger as their Secondary (4/5, Fight) with Crimson Fire as their Primary (things went…okay-ish…they may have trouble with the villagers since the Legion killed the villagers’ families and friends and burned down half the village).
I’m probably going to start an “Aldemari Distrust” 8-clock since they not only turned away the refugees, but were pretty ruthless with the villagers (both Hexed and non-Hexed), and if that clock fills, interactions with the Aldemari will have -1d (whether it’s QM resource gathering roll, or attempts to Sway the locals, etc) – I really want them to see there are serious consequences to every choice of-and-in missions that aren’t just “Intel” or “Supply” and so forth, but particularly from their choices and actions in the Primary.